FINAL SEMESTER 2 “ZENTANGLE” (300 POINTS) 20% of grade
SUPPLIES NEEDED:
12''x18'' inch drawing paper, magazines, scissors, glue stick, ruler, pencil, thin and thick black sharpie, colored pencils.
RUBRIC
100pts Use of Elements/ Principles of Art & Design: Did you create an interesting composition using a variety of shapes and patterns? Did you create a focal area or emphasis with your magazine cutout/collage piece? Are your patterns creating a range of values?
100pts Creativity / Originality: Did you explore several choices before selecting one; generating many ideas; tried unusual combinations or changes on several ideas?
100pt Craftsmanship/ Skill: Did you use the entire space of the paper? Is your artwork beautiful and patiently done? Did you fill the entire space with a tight pattern? Is your project as good as you could make it?
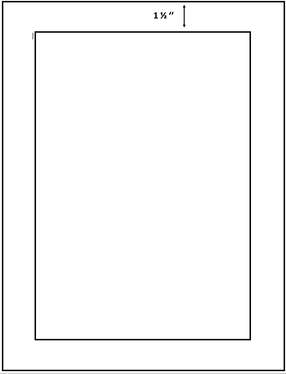
STEP #1 (Day 1) - BORDER. Draw a 1 1/2'' border all the way around the paper. This area will remain white. Do not draw in the border.
STEP #2 (Day 1 and 2) - EMPHASIS / COMPOSITION. Cut out an object or a figure from a magazine. Decide where it will go on your paper. Your paper orientation can be landscape or portrait. See rules of composition powerpoint below.
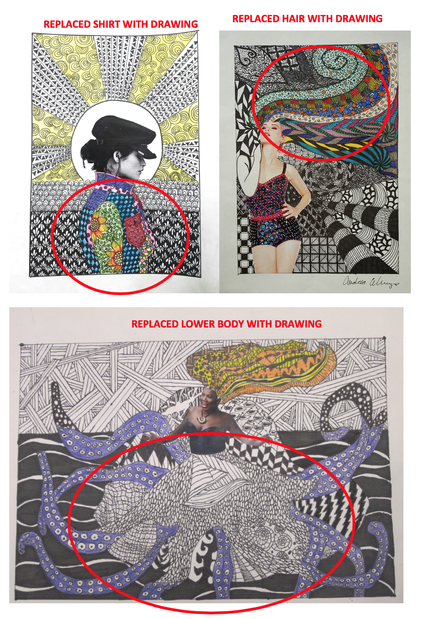
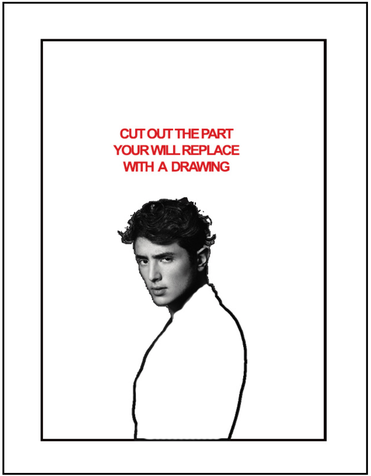
STEP #3 (Day 3) - EMPHASIS / COMPOSITION. Set your cut out on the paper and trace around it with your pencil. Cut out a part of the magazine cut out and replace it with a drawing. Glue down your magazine cutout.

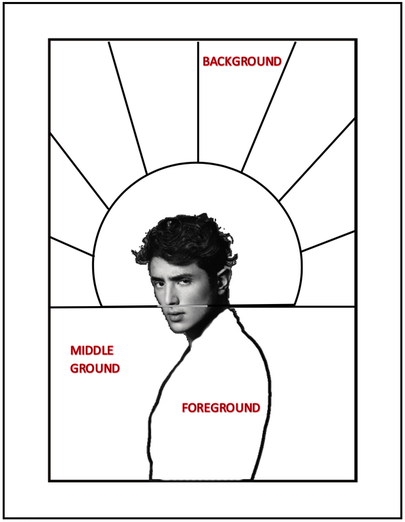
STEP #4 (Day 4) - MOVEMENT OR SPACE. Draw a background that creates movement or space. Space can be created by overlapping three planes. Foreground, middle ground, background. Movement can be created with abstract lines and shapes.
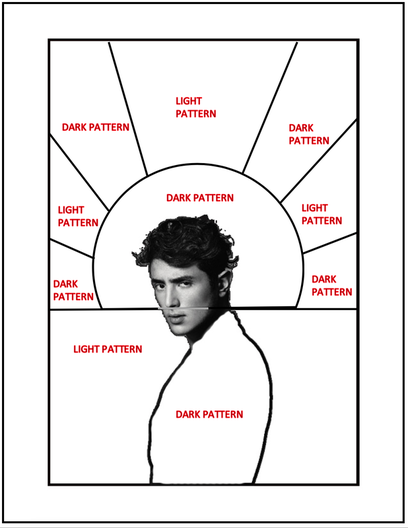
STEP #5 (Day 5 - 22) - FILL BACKGROUND WITH LIGHT AND DARK PATTERNS. Fill your background with dark and light patterns to separate the planes.
-Label your sections with a "D" and "L".
-Do not use clipart shapes for your patterns like stars, hearts and happy faces. Please use abstract shapes (shapes that don't represent anything). Create more sophisticated patterns. Below are examples of patterns. You can copy these but change them up a little to make them your own.
- Use a thin sharpie to outline all your patterns. Use the thick sharpie to fill in large areas of black.
-Also outline your border with a thin sharpie. Use a ruler!
examples of patterns you can use below
STEP #6 (Day 23) - ADD COLOR. Choose a few areas to add color to with colored pencils.
STEP #7 (DAY 24) - SIGNATURE. Sign the bottom right corner border with your signature. Must be in cursive. If you don't already have a signature follow the powerpoint below to help you create one. Print your name and period # on the back of your zentangle.

Click to set custom HTML
| signature_doc.docx |
